To configure your device, you need to follow the below steps:
Plug your device to your computer using the USB cable provided with the device.
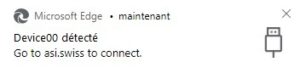
Once your device is recognised by your computer, the below message will appear at the bottom right of your screen. By clicking on the message, Insiders website will be opened in your default browser.
Under your browser’s address field, a list will be displayed.
Find the AdMos device and select it (2), then click on “Connect” (3).
Sensor’s details (4) and configuration (5) will be loaded automatically.
You will then be allowed to change its configuration.
Activate (checked) or deactivate (unchecked) the different sensors as you want.
“GPS” and “ECG” should be active in order to save the “Raw GPS” and “Raw ECG”.
”Raw IMU” will activate the accelerometer and gyroscope sensor log.
“Raw PRES” will activate the barometric sensor log.
“Dynamic Model” refers to GNSS internal filter. It allows you to select more accurately the type of sport session. It determine how the GNSS chip reacts depending on the activities performed. In 90% of use cases, a “portable” profile is sufficient, as it is a generic filter.
Portable: generic filter that applies to 90% of sport activities
Stationary: filter that applies to sensors that are not moving
Pedestrian: filter that applies to pedestrian activities such as walking, running, etc
Automotive: filter that applies to vehicules
Sea: filter that applies to aquatic activities
Airborn with <Xg: filter that applies to activities with high accelerations
To finalise the configuration of your device, click on “Save Config” (6).
The new config will need a few seconds to be loaded onto the device. Please wait a little bit before going to the next step. Note: you can erase the configuration changes by clicking on “Erase Config”.
In order to have the new settings log for the next usage, it is necessary to erase the data by pressing the “Erase Data” button (7).
Wait until the confirmation message “Data erased” appears (8).